Free ARM server with 4 CPUs, 24GB of RAM and 200GB storage!
Have you ever dreamed of having your very own ARM server in the cloud for FREE?

You're in luck! The Oracle Cloud Free Tier offers generous Always Free cloud services, including Ampere Altra ARM compute instances with enough RAM and storage to run decent workloads.
What's the catch? Well, it's the Oracle cloud. To motivate users to give their cloud a chance, Oracle is rolling out the red carpet: several resources are Always Free (you'll never pay for them!). New accounts also get a 30-day trial with several hundred dollars of credits to try the paid resources.
Account Creation
To get started, head over to the Oracle Free Tier sign up page. Creating an account is straightforward, and you'll need to enter credit information. However, fear not: the platform makes it clear that you can't be charged unless the account is upgraded. As for paid resources using credits from the 30-day trial, they first get disabled, and then deallocated if you choose not to pay to keep them.
If you still feel like it's too good to be true, the Oracle Cloud Free Tier FAQ should help address your concerns like it did for me.
Virtual Machine Creation
With your new account, go to the Oracle Cloud sign in page.
From the Oracle Cloud Compute menu, click Instances, then click Create instance
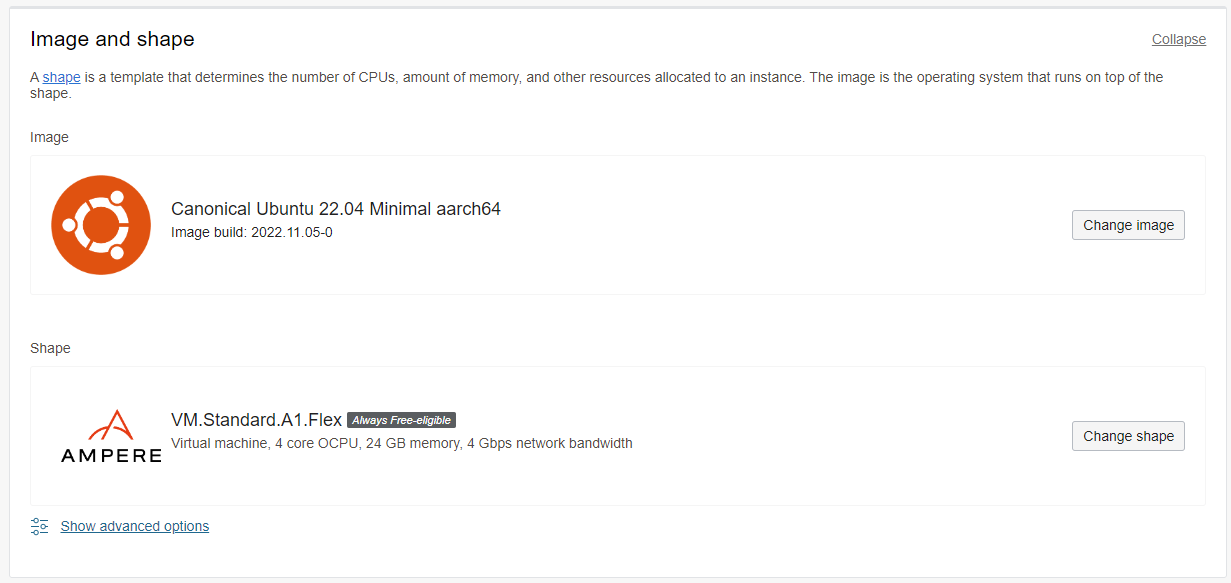
Enter a name for your new compute instance, select the root compartment, then click Edit in the Image and shape section.
Click Change image, then select the "Canonical Ubuntu" image name, then change the OS version to "22.04 Minimal aarch64" and then click Select image. The new ARM64 image will be automatically changed to a compatible shape (VM.Standard.A1.Flex).
Click Change shape, then increase the OCPU count to 4, and the amount of memory to 24 GB, which is the maximum available under the Always Free resources, then click Select shape.
Under Networking, create or select a Virtual Cloud Network (VCN) with default settings. Ensure that the Assign a public IPv4 address option is selected.
Under Add SSH keys, leave the Generate a key pair for me option selected, and then click Save private key and Save public key. Rename and move the files to the ~/.ssh directory on your computer. Make sure not to lose the SSH private key, as this is the only time it will be available for download.
Once you are done reviewing the VM configuration, click Create. The provisioning process should take just a few minutes, and was faster than I would have expected.
Initial Connection
Connect to the new virtual machine using its public IP address, and the SSH private key file saved previously. The default username is "ubuntu":
ssh ubuntu@168.138.68.44 -i ~/.ssh/ssh-packet-social.key
Welcome to Ubuntu 22.04.1 LTS (GNU/Linux 5.15.0-1022-oracle aarch64)
Update the package cache, upgrade existing packages, and then install a few tools:
sudo apt update && sudo apt upgrade -y
sudo apt install -y screenfetch nano git curl net-tools
System Information
It had been a while since I last did Linux system administration, so I reviewed the commands to use to print system information:
Print system information using screenfetch -n -N:
 OS: Ubuntu 22.04 jammy
 Kernel: aarch64 Linux 5.15.0-1022-oracle
 Uptime: 2d 17h 6m
 Packages: 702
 Shell: bash 5.1.16
 Disk: 3.7G / 46G (9%)
 CPU: 4x ARM Neoverse-N1
 RAM: 912MiB / 23988MiB
Print CPU information using lscpu:
Architecture:            aarch64
  CPU op-mode(s):        32-bit, 64-bit
  Byte Order:            Little Endian
CPU(s):                  4
  On-line CPU(s) list:   0-3
Vendor ID:               ARM
  Model name:            Neoverse-N1
    Model:               1
    Thread(s) per core:  1
    Core(s) per cluster: 4
    Socket(s):           -
    Cluster(s):          1
    Stepping:            r3p1
    BogoMIPS:            50.00
    Flags:               fp asimd evtstrm aes pmull sha1 sha2 crc32 atomics fphp asimdhp cpuid asimdrdm lrcpc dcpop asimddp ssbs
NUMA:
  NUMA node(s):          1
  NUMA node0 CPU(s):     0-3
It should be noted that the "OCPU" in Oracle terminology means 2 Intel vCPUs, and 1 ARM vCPU. It's a bit confusing, but in the case of ARM, 1 OCPU = 1 vCPU.
Print dynamic memory information using free -h:
ubuntu@packet-social:~$ free -h
               total        used        free      shared  buff/cache   available
Mem:            23Gi       566Mi        21Gi       143Mi       1.4Gi        22Gi
Swap:             0B          0B          0B
Print disk usage information using df -T -h:
ubuntu@packet-social:~$ df -T -h
Filesystem     Type   Size  Used Avail Use% Mounted on
tmpfs          tmpfs  2.4G  1.5M  2.4G   1% /run
/dev/sda1      ext4    45G  3.5G   42G   8% /
tmpfs          tmpfs   12G   28K   12G   1% /dev/shm
tmpfs          tmpfs  5.0M     0  5.0M   0% /run/lock
/dev/sda15     vfat    98M  5.1M   93M   6% /boot/efi
tmpfs          tmpfs  2.4G  4.0K  2.4G   1% /run/user/1001
Firewall Configuration
Ubuntu images on the Oracle Cloud don't come with ufw installed: iptables should be used instead. Use the following commands to allow HTTP (TCP/80) and HTTPS (TCP/443) in the firewall using iptables:
sudo iptables -I INPUT 6 -m state --state NEW -p tcp --dport 80 -j ACCEPT
sudo iptables -I INPUT 6 -m state --state NEW -p tcp --dport 443 -j ACCEPT
sudo netfilter-persistent save
You will also need to create corresponding ingress rules for your Virtual Cloud Network to expose TCP ports 80 and 443 on the Internet. Follow the steps from the "Enable Internet Access" section of the Free Tier: Install Apache and PHP on an Ubuntu Instance guide.
Next Steps
The default OS disk has limited space, but the Always Free resources include up to 200GB of block storage, so you can add more disks as needed. There are a LOT of services available in the Oracle cloud which you can explore through step-by-step tutorials.
This guide shows how to allocate the maximum number of resources to a single virtual machine, but it is possible to create up to 4 separate virtual machines with the same amount of OCPUs and RAM. A small VM with 1 OCPU and 6GB of RAM should be sufficient for a personal Pleroma/Mastodon fediverse instance.
It's up to you to decide how to split the available compute resources you have for free, so knock yourself out!