Automating Hyper-V Network Adapter Cleanup and IP Migration
If you've ever built Hyper-V lab environments with static IP configurations and later reused the VHDX files on a different host, you may have encountered the following issue:
- The old network adapter disappears but still retains the static IP configuration in the registry.
- The new network adapter created on import doesn't inherit the previous IP settings automatically.
This leads to all kinds of network problems, especially if you're migrating an Active Directory lab environment like I do. Today, I'll show you how to use PowerShell to automatically clean up Hyper-V network adapters and migrate static IP configurations to the correct adapter.
Simulating the Problem
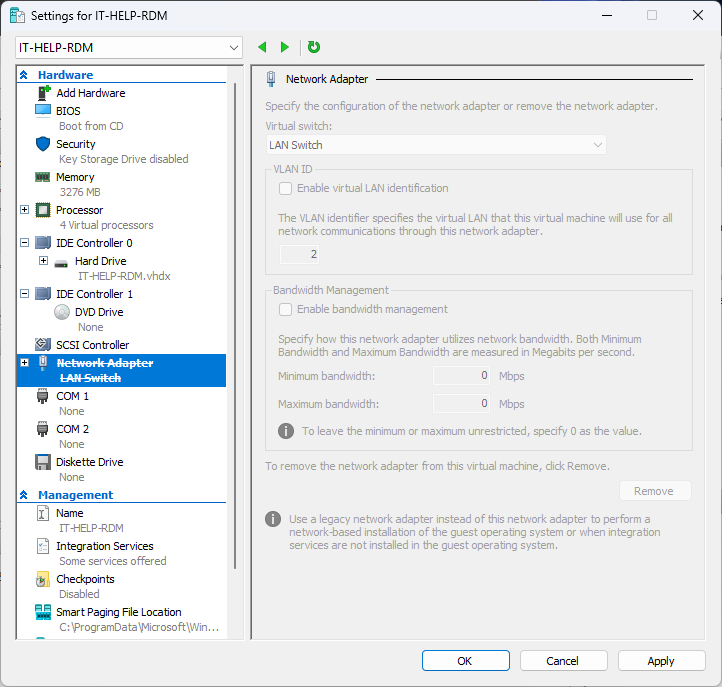
Fortunately, it's relatively easy to simulate the problem. Delete the network adapter from an existing test VM that was previously configured with a static IP. Then, add a new network adapter and attach it to the same Hyper-V virtual switch:
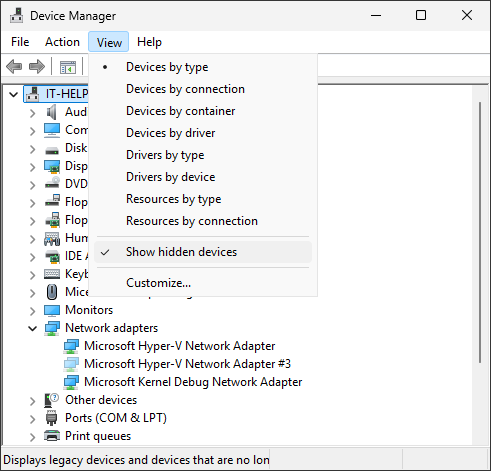
Boot the virtual machine. If DHCP is enabled, the VM will likely receive a different IP address than the one previously assigned statically. Open the Device Manager (devmgmt.msc), then under View, enable Show Hidden Devices. The old network adapter should be listed with a half-transparent "ghost" icon:
From the GUI, you could right-click the ghost network adapter, and select Uninstall device. However, we're not going to do that today, as we want to automate the process. Let's try listing Hyper-V network adapters in PowerShell using Get-NetAdapter -IncludeHidden:
PS> Get-NetAdapter -IncludeHidden | Where-Object { $_.InterfaceDescription -Like "*Hyper-V*" }

Name                      InterfaceDescription                    ifIndex Status       MacAddress             LinkSpeed
----                      --------------------                    ------- ------       ----------             ---------
Ethernet                  Microsoft Hyper-V Network Adapter             7 Up           00-15-5D-32-78-38        10 Gbps
Wait, where's our ghost network adapter? Despite its name, -IncludeHidden doesn't show devices like the Device Manager does. That means Get-NetAdapter isn't suitable for the task.
Listing All Hyper-V Network Adapters in PowerShell
Instead, we'll build our own Get-HyperVNetworkAdapterInfo cmdlet using Get-PnpDevice, Get-PnpDeviceProperty, and related information pulled from the registry:
function Get-HyperVNetworkAdapterInfo {
    [CmdletBinding()]
    param()

    $PnpDevices = @(Get-PnpDevice -Class Net | Where-Object { $_.FriendlyName -like '*Hyper-V Network Adapter*' })

    $PnpDevices | ForEach-Object {
        $ClassGuid = $_.ClassGuid
        $DeviceDriverProperty = Get-PnpDeviceProperty -InstanceId $_.InstanceId -KeyName 'DEVPKEY_Device_Driver' -ErrorAction SilentlyContinue
        if ($DeviceDriverProperty.Data -match '\\(?<subkey>\d{4})$') {
            $DeviceRegPath = "HKLM:\SYSTEM\CurrentControlSet\Control\Class\$ClassGuid\$($matches.subkey)"
            $NetCfgInstanceId = Get-ItemPropertyValue -Path $DeviceRegPath -Name NetCfgInstanceId -ErrorAction SilentlyContinue
            $NetCfgInstanceRegPath = "HKLM:\SYSTEM\CurrentControlSet\Services\Tcpip\Parameters\Interfaces\$NetCfgInstanceId"
            $NetCfg = Get-ItemProperty -Path $NetCfgInstanceRegPath | Select-Object IPAddress, SubnetMask, DefaultGateway, NameServer, EnableDHCP
            $NetConnectionRegPath = "HKLM:\SYSTEM\CurrentControlSet\Control\Network\$ClassGuid\$NetCfgInstanceId\Connection"
            $NetAdapterName = Get-ItemPropertyValue -Path $NetConnectionRegPath -Name Name
            [PSCustomObject]@{
                FriendlyName     = $_.FriendlyName
                NetAdapterName   = $NetAdapterName
                Status           = $_.Status
                InstanceId       = $_.InstanceId
                NetCfgInstanceId = $NetCfgInstanceId
                IPAddress        = if ($NetCfg.IPAddress) { $NetCfg.IPAddress[0] } else { '' }
                SubnetMask       = if ($NetCfg.SubnetMask) { $NetCfg.SubnetMask[0] } else { '' }
                DefaultGateway   = if ($NetCfg.DefaultGateway) { $NetCfg.DefaultGateway[0] } else { '' }
                NameServer       = $NetCfg.NameServer
                EnableDHCP       = $NetCfg.EnableDHCP
            }
        }
    }
}
Paste the Get-HyperVNetworkAdapterInfo cmdlet definition in PowerShell, then use it to list all Hyper-V network adapters:
PS> Get-HyperVNetworkAdapterInfo

FriendlyName     : Microsoft Hyper-V Network Adapter
NetAdapterName   : Ethernet
Status           : OK
InstanceId       : VMBUS\{F8615163-DF3E-46C5-913F-F2D2F965ED0E}\{B22F1BF5-12F6-480D-8F16-702AC7BE5CAA}
NetCfgInstanceId : {20BE1EE8-E115-4A5F-B1C0-B295B293E127}
IPAddress        :
SubnetMask       :
DefaultGateway   :
NameServer       :
EnableDHCP       : 1

FriendlyName     : Microsoft Hyper-V Network Adapter #3
NetAdapterName   : vEthernet (LAN)
Status           : Unknown
InstanceId       : VMBUS\{F8615163-DF3E-46C5-913F-F2D2F965ED0E}\{19E87F3D-4849-4959-B43D-75381017DB77}
NetCfgInstanceId : {99439FE2-D5F1-4E92-AEA3-4988838F2201}
IPAddress        : 10.10.0.9
SubnetMask       : 255.255.255.0
DefaultGateway   : 10.10.0.2
NameServer       : 10.10.0.3
EnableDHCP       : 0
Great — we can now list ghost Hyper-V network adapters, including their static IP configurations!
Cleaning Up Old Hyper-V Network Adapters
If your goal is simply to clean up ghost adapters without migrating IP settings, you can filter for adapters with an unknown status and use pnputil /remove-device with each adapter's instance ID:
Get-HyperVNetworkAdapterInfo | Where-Object { $_.Status -eq 'Unknown' } | ForEach-Object {
    Write-Host "Removing ghost network adapter: '$($_.NetAdapterName)'"
    & pnputil /remove-device "$($_.InstanceId)"
}
Migrating IP Configuration to New Hyper-V Adapter
Let's take things a step further with an automated script that migrates network settings from an old Hyper-V adapter to a new one. This way, VMs using a shared VHDX can automatically restore their static IP configuration on first boot. Here's the plan:
- Detect the old network adapter with a static IP matching "10.10.0.*"
- Identify the new network adapter with no assigned IP address
- Remove the old (ghost) network adapter
- Rename the new adapter to match the previous one
- Reassign the previous static IP address to the new adapter
- Reapply the previous DNS server configuration
Here's the resulting script, which you can adapt for your needs:
$NetAdapters = Get-HyperVNetworkAdapterInfo
$OldAdapter = $NetAdapters | Where-Object { $_.Status -eq 'Unknown' -and $_.IPAddress -Match "10.10.0.*" } | Select-Object -First 1
$NewAdapter = $NetAdapters | Where-Object { $_.Status -eq 'OK' -and [string]::IsNullOrEmpty($_.IPAddress) } | Select-Object -First 1

if ($OldAdapter -and $NewAdapter) {
    Write-Host "Removing old network adapter: '$($OldAdapter.NetAdapterName)'"
    & pnputil /remove-device "$($OldAdapter.InstanceId)"

    $NetAdapterName = $OldAdapter.NetAdapterName
    $IPAddress = $OldAdapter.IPAddress
    $SubnetMask = $OldAdapter.SubnetMask
    $DefaultGateway = $OldAdapter.DefaultGateway
    $NameServer = $OldAdapter.NameServer
    Write-Host "Renaming new network adapter to '$NetAdapterName'"
    Rename-NetAdapter -Name $NewAdapter.NetAdapterName -NewName $NetAdapterName
    $PrefixLength = ([System.Net.IPAddress]::Parse($SubnetMask).GetAddressBytes() |
        ForEach-Object { [Convert]::ToString($_, 2).PadLeft(8, '0') -split '' } | Where-Object { $_ -eq '1' }).Count
    $Params = @{
        IPAddress = $IPAddress;
        InterfaceAlias = $NetAdapterName;
        AddressFamily = "IPv4";
        PrefixLength = $PrefixLength;
        DefaultGateway = $DefaultGateway;
    }
    Write-Host "Configuring '$NetAdapterName':"
    Write-Host "`tIPAddress: $IPAddress`n`tSubnetMask: $SubnetMask`n`tDefaultGateway: $DefaultGateway"
    Set-NetIPInterface -InterfaceAlias $NetAdapterName -Dhcp Disabled
    Get-NetIPAddress -InterfaceAlias $NetAdapterName -AddressFamily IPv4 -ErrorAction SilentlyContinue | Remove-NetIPAddress -Confirm:$false
    New-NetIPAddress @Params
    Write-Host "Setting DNS server: $NameServer"
    Set-DnsClientServerAddress -InterfaceAlias $NetAdapterName -ServerAddresses $NameServer
}
After running the script, use ipconfig /all to verify that it worked as intended:
Ethernet adapter vEthernet (LAN):

   Connection-specific DNS Suffix  . :
   Description . . . . . . . . . . . : Microsoft Hyper-V Network Adapter
   Physical Address. . . . . . . . . : 00-15-5D-32-78-38
   DHCP Enabled. . . . . . . . . . . : No
   Autoconfiguration Enabled . . . . : Yes
   IPv4 Address. . . . . . . . . . . : 10.10.0.9(Preferred)
   Subnet Mask . . . . . . . . . . . : 255.255.255.0
   Default Gateway . . . . . . . . . : 10.10.0.2
   DNS Servers . . . . . . . . . . . : 10.10.0.3
   NetBIOS over Tcpip. . . . . . . . : Enabled
Success — this virtual machine previously had a static IP of 10.10.0.9, which has now been fully migrated to the new Hyper-V network adapter, along with the rest of its network configuration.
Self-Healing Hyper-V Network Adapter Configuration
Let's take it one step further and make your Hyper-V network adapter configuration self-healing — with no manual intervention required.
Save the previous script as Fix-NetworkAdapters.ps1 under C:\tools\scripts, then create a scheduled task to run it automatically at system startup:
$TaskName = "Fix-NetworkAdapters"
$ScriptPath = "C:\tools\scripts\Fix-NetworkAdapters.ps1"
$Action = New-ScheduledTaskAction -Execute "powershell.exe" -Argument "-NoProfile -ExecutionPolicy Bypass -File `"$ScriptPath`""
$Trigger = New-ScheduledTaskTrigger -AtStartup
$Principal = New-ScheduledTaskPrincipal -UserId "SYSTEM" -LogonType ServiceAccount -RunLevel Highest
Register-ScheduledTask -TaskName $TaskName -Action $Action -Trigger $Trigger -Principal $Principal
Now shut down your VM, re-create the Hyper-V network adapter to simulate the problem, and start it up again. That's it — your virtual machine will now automatically repair its network adapter configuration on boot!
Closing Thoughts
Why not use DHCP? I could — but for my use case, it's much simpler to assign a number to each lab virtual machine and derive its IP address from that. It makes the setup far more predictable, and I don't need to bother extracting MAC addresses to configure static DHCP leases.
Even if I wanted to use DHCP with static assignments, the platform I'm uploading the VHDX files to doesn't expose DHCP settings beyond "Enable DHCP".
In my case, the simplest approach was to build the lab locally, upload the VHDX, and let each virtual machine automatically restore its original network configuration — even inside a new Hyper-V host.